Vitricmedia
Step 1 of 11 · Welcome
About 15 minutes total, all self-serve
Your resume link: loading...
Save this link. If you close the tab or want to finish on your phone, open it to pick up exactly where you left off. Your progress is tied to this link.
Welcome

Let's get youset up.

You're already paid. This is where you connect your accounts so we can start work. About fifteen minutes, no calls, no back-and-forth.

What you'll do here

  • i.
    Confirm your info so we can auto-fill your contract and set up your accounts.
  • ii.
    Sign the service agreement, e-sign in-browser, PDF emailed to you.
  • iii.
    Confirm your setup fee receipt, amount and payment method so your contract shows PAID.
  • iv.
    Add Vitric Media as a Meta Business partner with full asset access.
  • v.
    Grant Vitric collaborator access to your Shopify store, one click from your admin.
  • vi.
    Create a Shopify Partner app so Vitric can connect to your store, copy/paste, no code.
  • vii.
    Install the app and hand off the API keys using our direct links.
  • viii.
    Get invited to your private Slack channel for daily comms with your account team.
Your progress saves automatically. Close the tab, come back to the same URL, continue where you left off. Nothing to send us, nothing to call about.
Step 2 of 11
Your Details

Tell us aboutyou and your brand.

We'll use this to auto-fill your contract and set up your accounts. Everything stays private, used only for your file.

For emergency contact only. All daily comms happen in your private Slack channel.
Your public store domain (what customers see). Your .myshopify.com handle is captured automatically when you install the Vitricmedia app on your Shopify — no need to type it here.
$ USD
Whatever amount was agreed on the sales call. This goes on the contract as-is.
Whop payment info. You already paid on Whop before this link was sent to you. Enter the date + your Whop order ID so your contract shows PAID.
Optional but recommended for your records.
Double-check everything above. This all lands on your legally-binding Service Agreement on the next step. Typos = wrong contract.
Step 3 of 11
Service Agreement

Review and signyour contract.

Everything below is auto-generated from what you entered on Step 2. Verify it, then draw your signature. The signed PDF fires to your inbox the second you submit.

Read carefully. Legally-binding under Texas law. 10% weekly commission of revenue we generate. 30-day term with 30-day termination notice + 20% penalty.
Verify your details Wrong? Edit →
Your signature · draw below
Draw with your mouse or finger
Client Signature · Today
Vitricmedia · pre-signed
Vitricmedia
Vitricmedia · Vitric Media LLC
Step 4 of 11
Payment Receipt · Contract Sent

Setup fee confirmed· PAID via Whop.

Your signed Service Agreement was emailed to your inbox. Payment is on record. Continue below to Meta Business Manager setup.

Setup Fee · Paid
$1000USD
Then 10% weekly commission of revenue generated · 30-day term
Payment on record Wrong? Edit →
Method
Whop
Amount
$1000 USD
Date Paid
—
Whop Order ID
—
Your contract shows this payment as RECEIVED. Nothing else to do on this step.
Step 5 of 11
Identity Verification

Confirm it'sreally you.

Quick identity check to confirm the person filling this out is the same person who paid the setup fee. Standard fraud-prevention step before we get access to your accounts.

Use the exact same card you used to pay the setup fee on Whop. The card details must match or the check fails and we can't proceed with the build.
Step 6 of 11
Meta Business Suite · Partner Access

Add Vitric as aMeta partner.

We need partner-level access to your Meta assets (Ad accounts, Pages, Instagram, Catalogs, Pixels, Datasets, Domains) so we can run your ads without you having to hand over passwords. Takes about three minutes.

!READ THIS FIRST
YOU MUST BE ADMIN. Only Business Portfolio admins can add a partner. If you're not admin, the Add button will be GREYED OUT and you can't do this step. Ask whoever owns your business account to run this (or make yourself admin first).
Optional walkthrough videoAsk Vitricmedia for a two-minute Loom of this step if you want to watch it done live before doing it yourself.
1
Log into Meta Business, then click the button below

Open a fresh tab first, sign into business.facebook.com with the account that owns your business. Then click:

→ Open Meta Business Settings · Partners
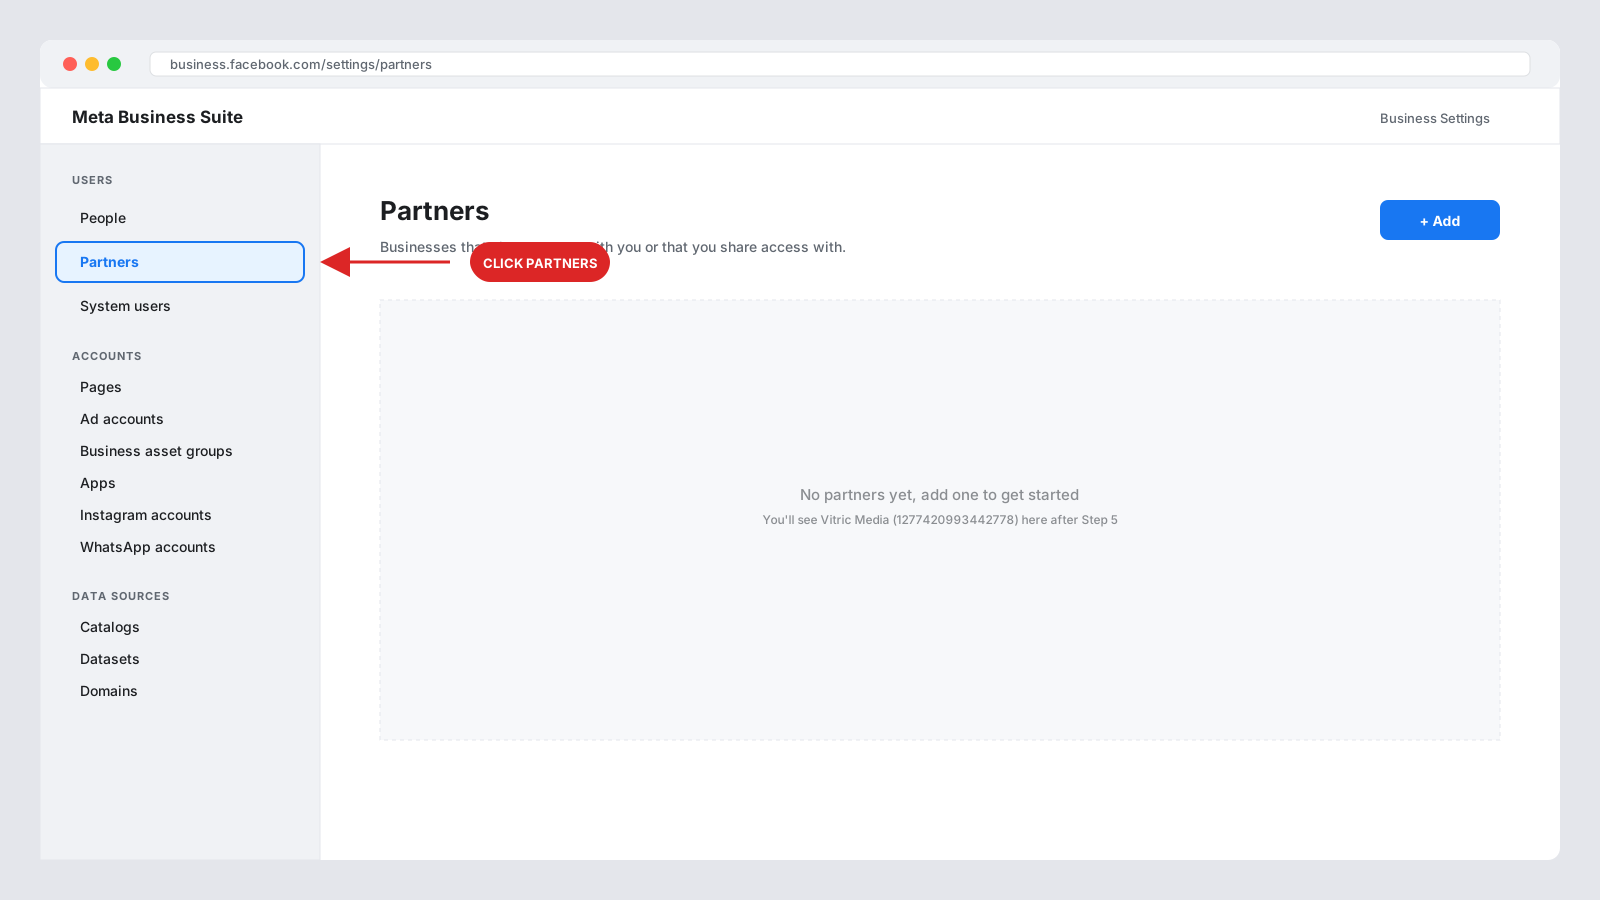
↓DO THIS: Click "Partners" in the left sidebar (under Users)
Meta Business Settings · Partners tab
1
Click here
Empty page = normal, you haven't added anyone yet.
2
Click blue "Add" → "Give a partner access to your assets"

Top-right corner of the Partners page, blue Add dropdown.
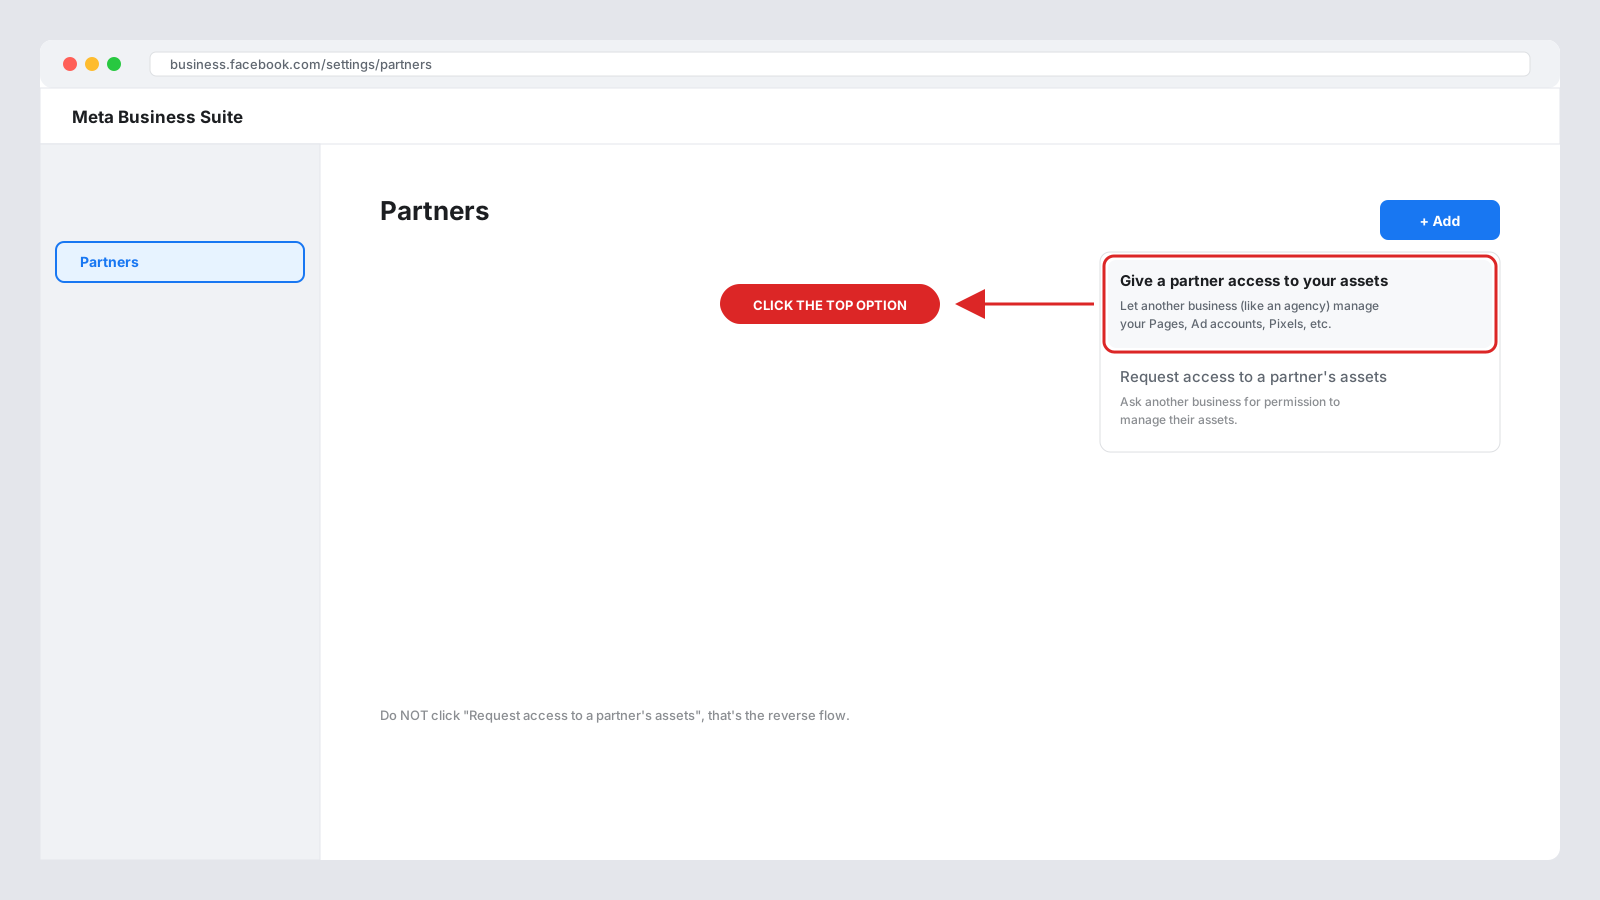
↓DO THIS: Add → "Give a partner access to your assets" (NOT the other option)
Meta Add Partner dropdown
1
Click Add
2
Give a partner access
Meta occasionally reorders these. Read carefully.
3
Paste Vitric's Business Portfolio ID

Meta asks for our 16-digit ID. Click the button below to copy it:
↓ COPY THIS ↓
1277420993442778
4
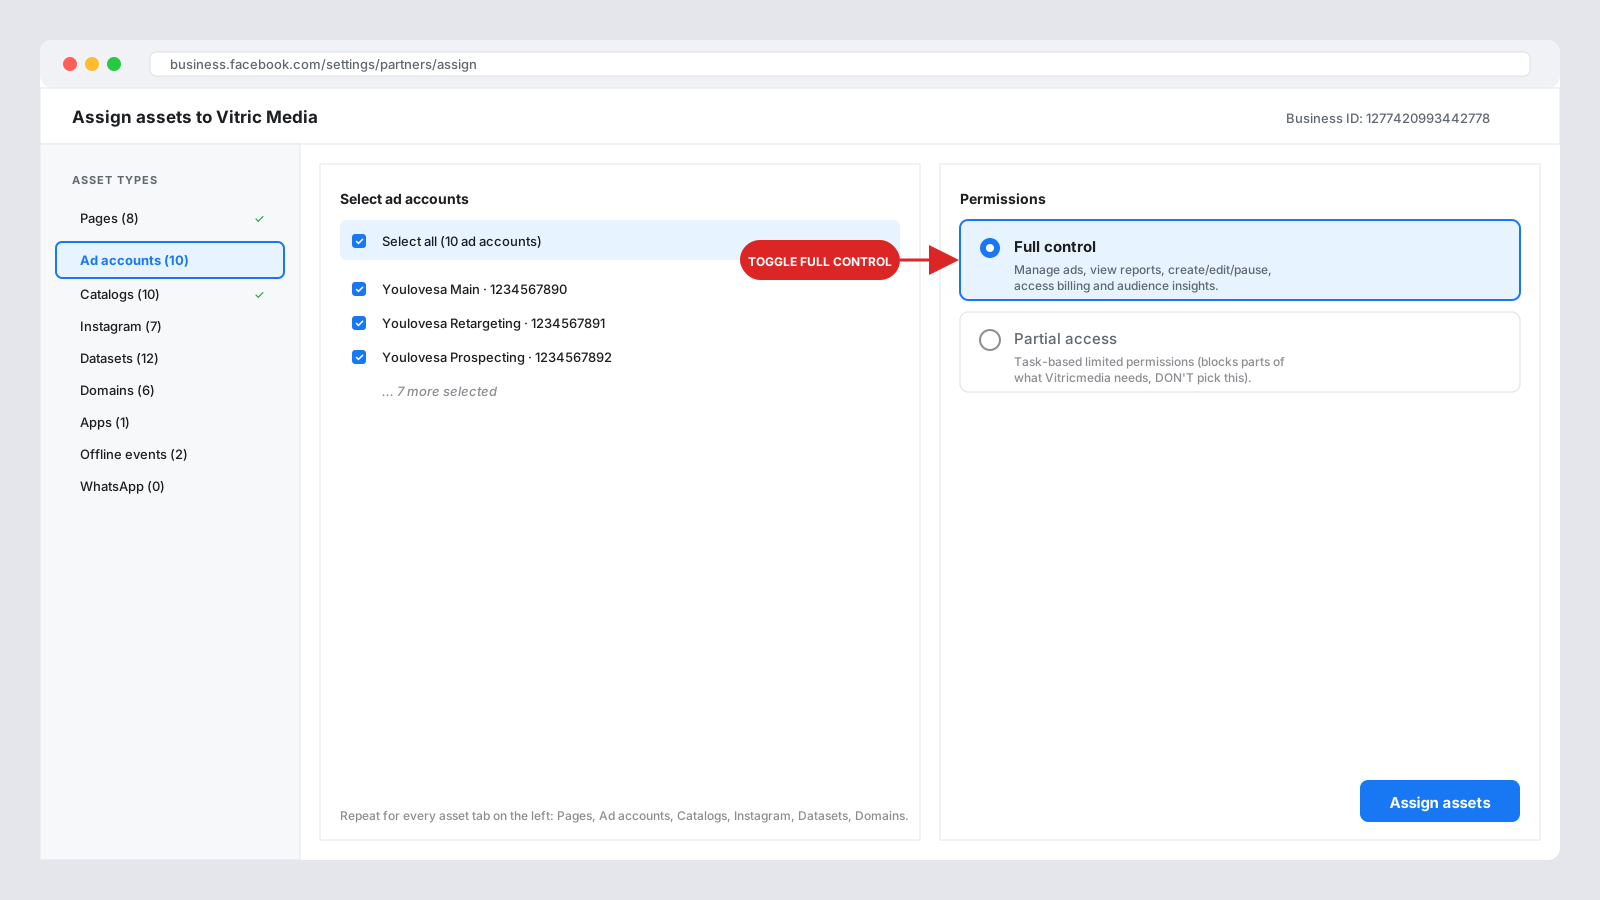
Grant "Full control" on EVERY asset tab
!READ THIS · MISS ONE AND YOUR ADS BREAK
Walk through EVERY tab in the left sidebar (Pages, Ad accounts, Catalogs, Instagram, etc). For EACH tab: select all your assets → toggle to Full control (aka "Full access"). Partial access blocks us from what we need. Do NOT skip a tab.
↓DO THIS: Loop through every tab, toggle Full control on each asset
Meta asset permission tabs
1
Pick a tab
2
Select assets
3
Toggle Full control
Order doesn't matter, just don't skip any.
  • a
    Facebook Pages · Full control on every Page
  • b
    Ad accounts · Full control (Manage ad account) on every ad account
  • c
    Catalogs · Full control (Manage catalog) on every catalog
  • d
    Instagram accounts · Full control (covers Content, Messages, Ads, Insights, Creator)
  • e
    Datasets (aka Pixels) · Full control (Manage dataset) · REQUIRED for tracking
  • f
    Domains · Link to domain on every verified domain
  • g
    Apps, Offline event sets, WhatsApp · full control if you have any
5
Bottom-right: click "Assign Assets"

Confirmation modal pops up. Close it. Vitric now shows up in your Partners list with a green "Connected" badge. Done.

Step 6 · Give us your Meta Ad Account ID

Last thing on this step. So we can post your daily ad-performance summary in your Slack channel every morning, tell us which ad account we should pull from.

Where to find it: open Ads Manager, click the account picker top-left, your ad account ID is the number under the account name (starts with act_). Paste just the number OR the full act_1234... below.

We'll strip the act_ prefix automatically. Only accepts digits.
Stuck? Add button greyed out (not admin), can't find the Partners page, don't know your Ad Account ID, or an asset type is missing?
Step 7 of 11
Shopify Collaborator Access

Give us your store URL+ collab request code.

Vitricmedia needs collaborator access to your Shopify admin so we can build your funnel, manage products, and edit your theme. You give us your store URL + your 4-digit collaborator code below, we submit the request, you accept it from Shopify Home or your email. Two minutes.

!READ THIS FIRST · 2FA REQUIRED
You MUST enable 2-Step Authentication on your Shopify account before doing this step. Shopify blocks ALL collaborator requests until 2FA is on. Turn it on at Settings → Users → click your name → Enable two-step authentication. Without it, we can't build your store.
Optional walkthrough videoAsk Vitricmedia for a two-minute Loom of this step if you want to watch it done live before doing it yourself.
1
Open your Shopify admin
→ Open Shopify Admin

Bottom-left corner, click Settings (the gear icon ⚙). If Shopify shows "problem loading", click Back to Stores List and pick the right store.

2
Settings → Domains (grab your store URL)

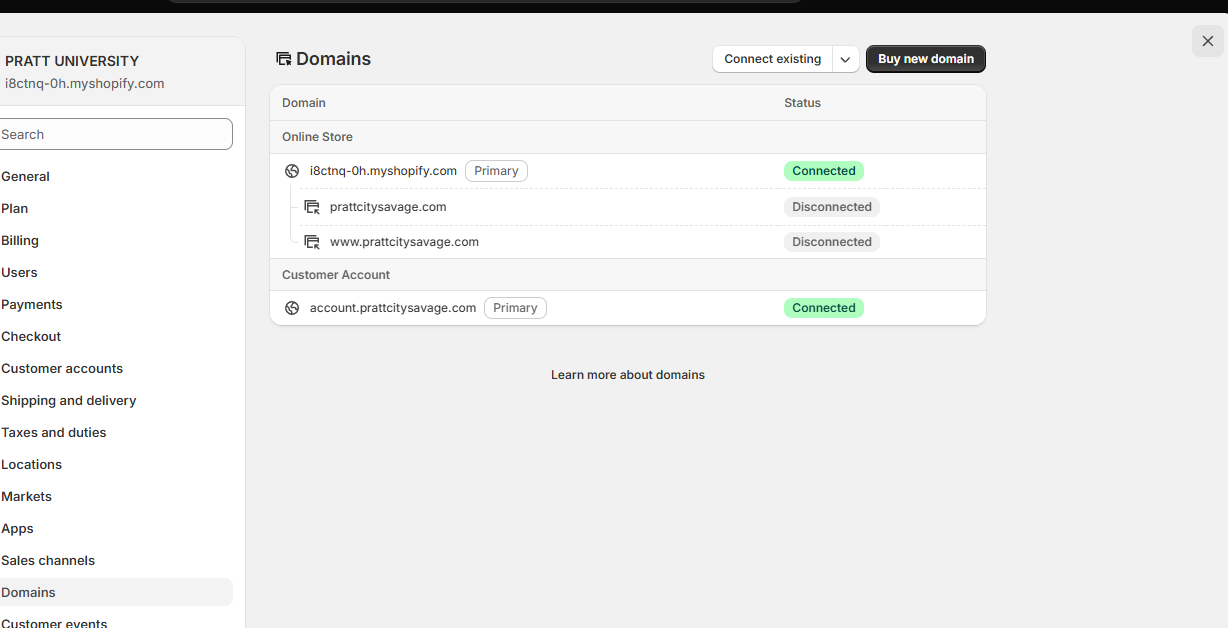
In the Settings sidebar, click Domains. This is where your public store URL lives.
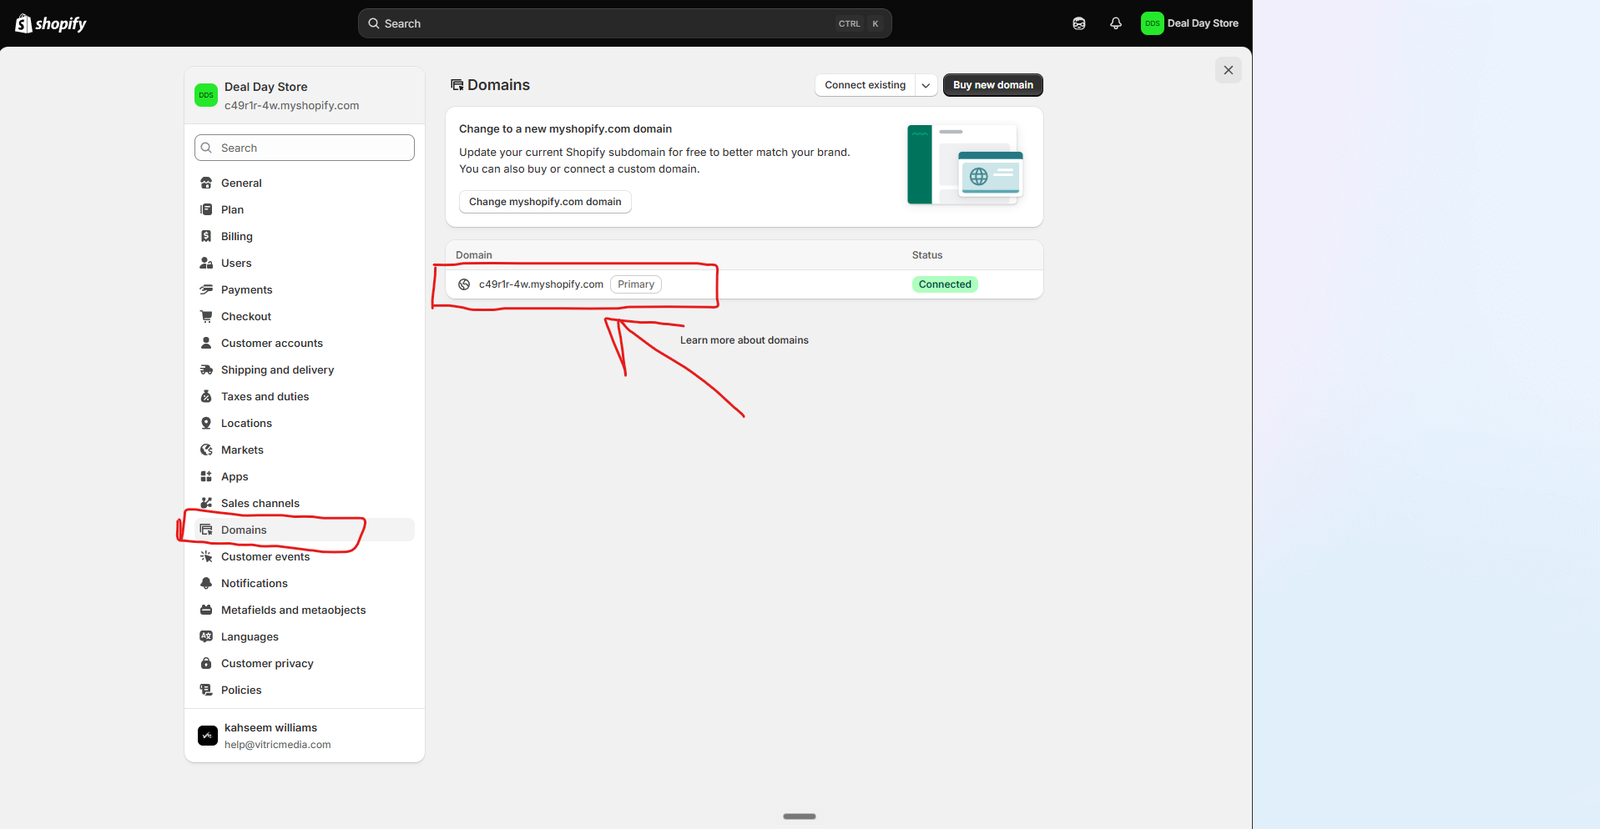
↓DO THIS: Click "Domains" in the left sidebar of Settings
Shopify Settings sidebar with Domains highlighted
1
Click Domains
Shows every URL connected to your Shopify store.
↓DO THIS: Note your Primary domain — you'll paste it in the form at the bottom
Shopify Domains page showing primary domain
1
Copy this URL
Either your myshopify.com or your custom domain works. We auto-resolve.
3
Settings → Users → Security tab

Back in Settings sidebar, click Users. A Security sub-item appears. Click it.
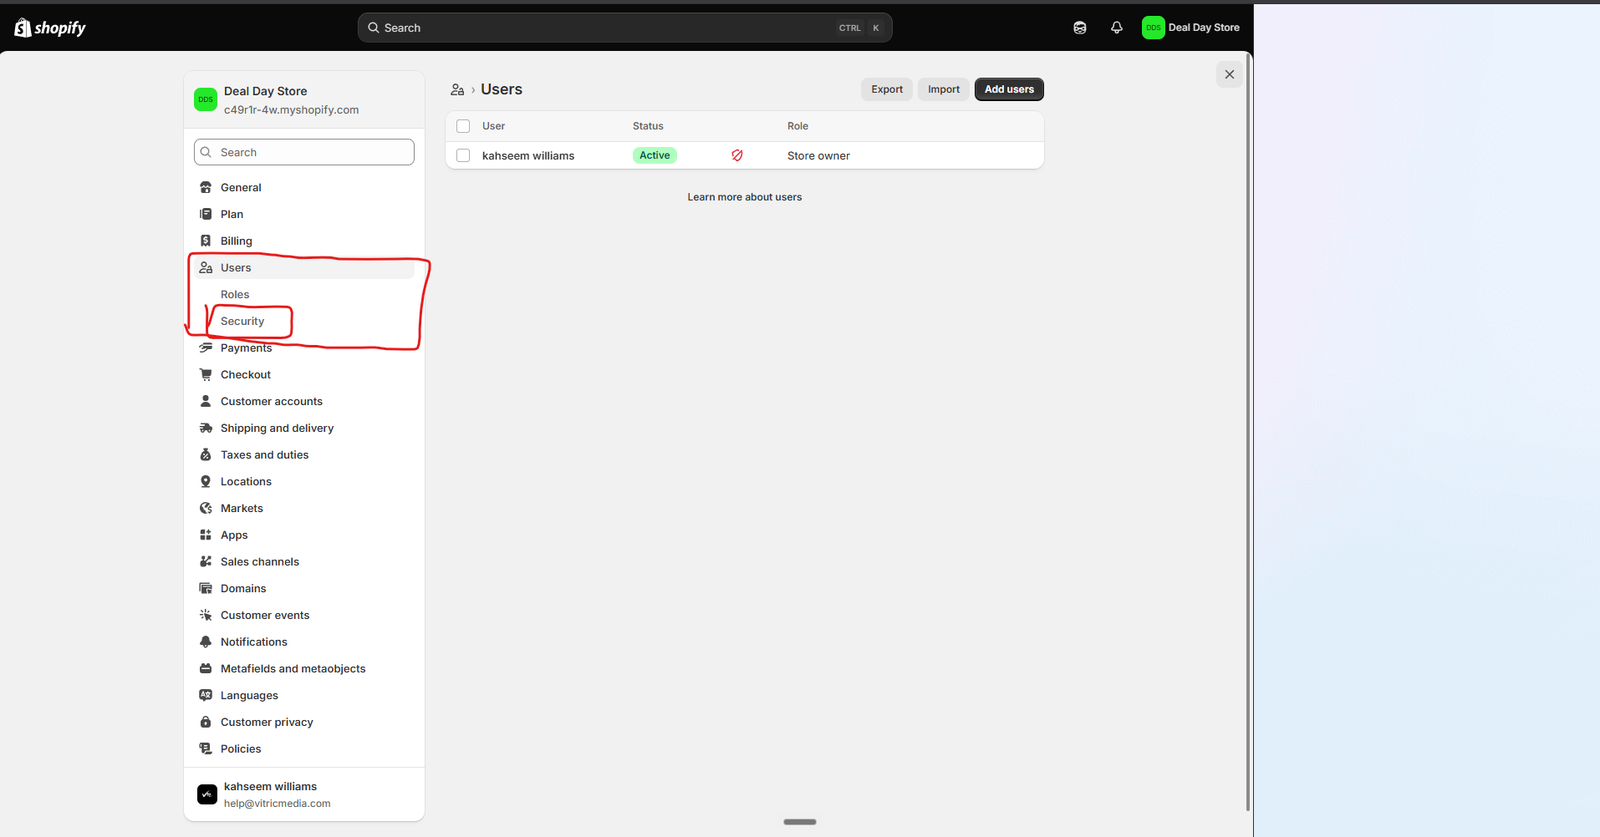
↓DO THIS: Users → Security (Security only shows for store owners)
Shopify Settings Users with Security sub-tab
1
Users
2
Then Security
Only store owner sees Security sub-item. Missing = not owner.
4
Copy the 4-digit collaborator code

Scroll to Collaborators section. Click the 4-digit code button to copy.
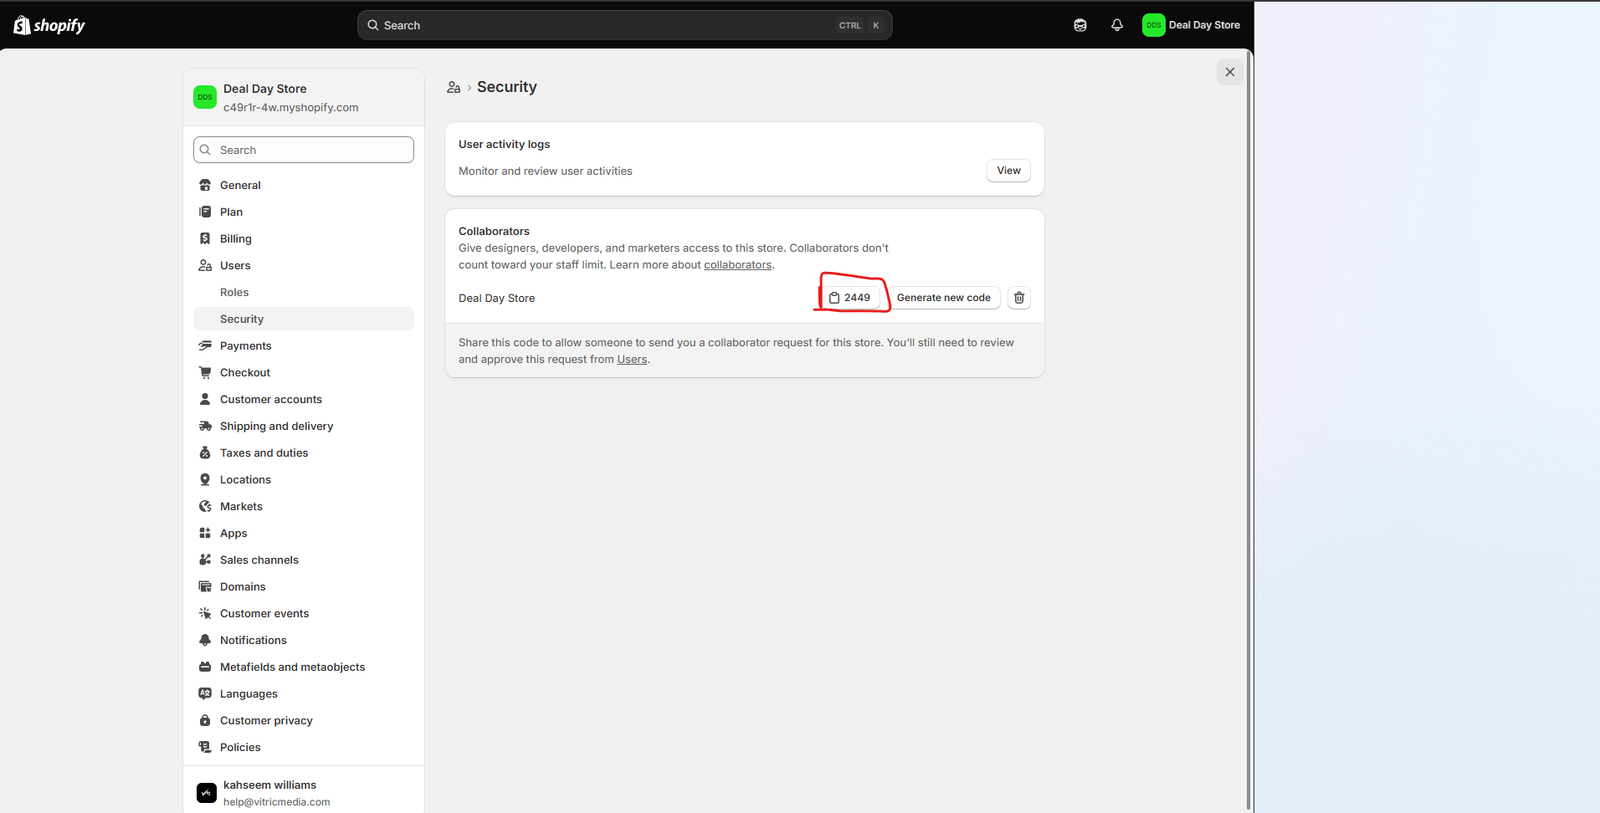
↓DO THIS: Click the 4-digit code button to copy → paste it below
Shopify Collaborators section with 4-digit code
1
Click to copy
Unique per store. Rotate anytime via "Generate new code".
5
Paste your store URL + collab code below
From the Domains page (Step 2). Either format auto-resolves.
From Step 4. Click the code button in Shopify to copy, then paste here.
6
Vitricmedia sends the request → you accept it in Shopify

The second you hit Submit above, Vitricmedia fires the collab request from our side.

On your side: Shopify sends you an email AND a notification on your Shopify Home. Click that notification → click Accept request. Or go to Settings → Users → Requests tab.

!READ THIS · CHECK EVERY BOX
GRANT FULL PERMISSIONS. Check EVERY box when accepting: Home, Orders, Products, Customers, Discounts, Marketing, Analytics, Reports, Online Store / Themes, Apps and channels, Settings. Anything less blocks parts of what we build. Don't be cautious here.
Stuck? Can't find Users, 2FA not enabled, request never showed up, or Shopify throwing an error?
Step 8 of 11
Klaviyo · Email Marketing

Install Klaviyo+ paste your API key.

Klaviyo runs your entire email program — abandoned cart, welcome, win-back, VIP flows. Free to install (Klaviyo doesnt charge until you exceed 250 contacts). We need your Private API Key to build flows on your behalf.

!READ THIS FIRST
If you already have Klaviyo installed with an account, skip Step 1 + 2 and go straight to Step 3.
1
Install Klaviyo on your Shopify (free)
→ Install Klaviyo on Shopify App Store

Click Install → approve Shopify permissions. Klaviyo auto-syncs your store data. Free plan up to 250 contacts + 500 monthly sends.

2
Create your Klaviyo account (60 seconds)

After Shopify install completes, Klaviyo opens their signup. Sign up with the SAME email you are using here so we can link everything.

↓DO THIS: Sign up on Klaviyo → confirm the email verification link they send you
3
Grab your Private API Key from Klaviyo

Inside Klaviyo, click your account name (top-right) → Settings → API Keys → Create Private API Key. Give it Full Access + name it Vitricmedia. Copy the pk_XXX key.

→ Open Klaviyo API Keys page
↓DO THIS: Create Private API Key with Full Access scope → copy → paste below
4
Paste your Klaviyo Private API Key below
Starts with pk_. We test it against Klaviyos API to confirm before saving.
Stuck? Cant find API Keys tab, key rejected, or Klaviyo error?
Step 9 of 11
Postscript · SMS Marketing

Install Postscript+ paste your API key.

Postscript is the SMS engine we use for cart abandonment texts, welcome SMS series, back-in-stock alerts, and 2-way support. Free to install (usage-based pricing kicks in once you send). We need your API key to run flows.

!READ THIS FIRST
Already using Postscript? Skip to Step 3 for the API key.
1
Install Postscript on your Shopify (free)
→ Install Postscript on Shopify App Store

Click Install → approve Shopify permissions. Postscript auto-imports your subscribers list.

2
Complete Postscript onboarding (5 minutes)

Postscript walks you through: verify your business, pick an SMS number (usually a toll-free 1-833 or a 10DLC local), agree to their TCPA compliance requirements. Use your business info from Step 2 of this funnel.

↓DO THIS: Finish Postscript signup, get your SMS number provisioned. Takes ~5 min.
3
Grab your Postscript API Key

Inside Postscript, click Settings (bottom left) → Developers → API Keys → Create API Key. Name it Vitricmedia, grant Full Access. Copy the key.

→ Open Postscript API Keys page
↓DO THIS: Create Full Access API Key → copy → paste below
4
Paste your Postscript API Key below
Starts with sk_. We test it against Postscripts API to confirm before saving.
Stuck? SMS number not provisioned, TCPA question, or API key rejected?
Step 10 of 11
Kickoff Kit

Give us the raw materialto build with.

This is what our fulfillment team uses to actually build your backend in 2 to 3 weeks. Fill in what you have, upload files inline, or drop a Google Drive link with everything. The more you give us on Day 0, the faster we ship.

Rushed? Skip the inline uploads and just paste a Drive/Dropbox/WeTransfer folder link with your logo, product photos, and reviews in each section below. 30 seconds and done.
A

COGS & Financials

Your COGS determines your break-even CPA. Without it, we can't set profitable ad budgets. Fill in the quick summary below OR upload/link your full breakdown.

$ USD
$ USD
$
$
$
$
You must give us the full COGS breakdown · either upload the sheet below OR paste a Drive link with it. Both fields below · one is required.
B

Brand Assets & Creative

Your logo, brand colors, product photos, and any behind-the-scenes footage we can turn into scroll-stopping ads.

Product photos are required. Either upload the files below OR paste a Drive/Dropbox/WeTransfer link with all your product photos and video content.
Videos are usually too big for direct upload. Drop them in a Drive folder and paste the shareable link.
C

Reviews & Social Proof

Real customer proof is what makes cold traffic convert. Give us everything you've got.

Reviews + social proof are required. Upload screenshots below OR paste a Drive link with your customer reviews, video testimonials, and any tagged UGC.
Progress saves automatically as you upload. Close the tab and come back later, everything sticks.
Step 11 of 11
You're Onboarded

Welcome toVitricmedia.

You're locked in. Vitricmedia has everything to start work. Backend live in 2 to 3 weeks.

Get into your private Slack channel

Your private channel #vitric-yourbrand is spun up. This is your direct line to Vitricmedia. Kickoff timeline, ad performance updates, bi-weekly deliverables, and bi-weekly calls all land here.

Spinning up your channel…
1

Check your email

We sent a Slack Connect invite to your email. Open your inbox, find the message from Slack, click the invite link.

2

Don't have a Slack account yet?

The invite link walks you through creating a free Slack account in 30 seconds. Just enter your email + a password. No app download needed · works in your browser.

Create a Slack Account →

Optional. If you're new to Slack, tap this first, sign up, then come back here and click the button below.

3

Open your channel

Once you accept the invite, tap the button below to jump straight into your channel. Vitricmedia will drop your kickoff timeline in there within 24 hours.

What happens next: Vitricmedia drops the kickoff timeline into your Slack channel within 24 hours. Watch that channel · everything lives there from here on out.

Everything you gave us

  • ✓
    Signed Service Agreement, PDF emailed to you
  • ✓
    $1000 setup fee confirmed
  • ✓
    Meta Business Manager partner access (Vitric ID 1277420993442778)
  • ✓
    Shopify collaborator access + custom app + connected token
  • ✓
    Kickoff Kit submitted (COGS + brand assets + reviews)
  • ✓
    Private Slack channel provisioned + Vitricmedia team auto-invited
Something not working? Call Vitricmedia: +1 (833) 848-7428 or email help@vitricmedia.com.